A little explanation with this *.gif:
the mask was airbrushed, together with some touching up with the smudge tool, and the pattern was made with the clouds filter. whenever you use the filter clouds on an image with the size 128x128, 256x256, 128x512 or something which is a multiple of 128, it creates a repeating pattern. In the animation of the *.gif, the pattern goes upwards, which, together with the mask makes it seem as if the fire burns. Since it's a repeating pattern, the animation loops forever.
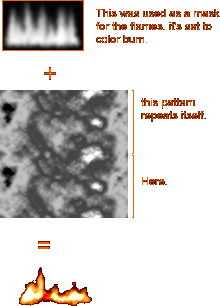
and:
quote:The layer isn't really a mask, I just call it a mask since it cuts away the black parts. It's set to color burn, that's all to it.
The clouds layer is a bit trickier... I think I first started with a 256(width)x128(heighth) canvas, and did [filter>render>clouds] some times until I came up with something nice. (maybe you can try throwing in a [filter>render>difference clouds] Then I resized it to 128x64, and put several of them on top of achother, and tested it with the 'mask' layer on. if your clouds layer doesn't work, you might want to try [image>adjust>curves] (CTRL-M) and try give the curve a 'M' shape... sorry if this is a bit vague, but there's no infallible way to make it right...
on making the masks:
quote:I started with a white stripe on the bottom (where the fire's supposed to start) and used the smudge tool (press 'R' to get it) to... err... smudge it.
The main differences in the masks with PS6.x and 5.x is that the 6.x version is black with a white 'blurred flame' shape in the middle, and the 5.x version is black and has a transparent hole where the flame's supposed to go.
If you've got PS5.x, you'll need to make the mask first in black and white, and if you're done, go to the 'channels' palette, and control click on one of the color channels (red, green or blue) By control-clicking one of them, the white parts of the picture will be completely selected, the 50% gray parts will be 50% selected, and the black parts unselected.
Create a new layer, press CTRL-SHIFT-I (or click select>inverse) to invert the selection, and fill that with black. Here you go, a mask.
on transparency (see link below too):
quote:Oh, transparency... yes. Y'see, that's not possible. The place where the flames aren't visible (so where the background's supposed te be visible) is covered by the black of the flame mask. What you could di is exporting it in *.gif, loading that gif again in imageready, and cutting the background color in every frame.
Simple way of doing this: go to PS, and record an action. Pick with the eyedropper tool the background color from your picture, click on [select>color range], set the fuzziness to 0, click 'OK'. Press delete, and your background will be gone. Repeat with the rest of the frames.