2) open the GIF in imageready. If everything went well, you'll have a layer for every frame of the animation.
3) find yourself a photo. make a new document in PS, one that has the same size as the animation has. paste your photo in there.
4) if you have read a certain Displace tutorial at the gurusnetwork you'll quite have an idea what to do. If you haven't this might be a good time. you don't really have to for this 'tutorial', but it's good to read sooner or later. because it's useful. We're going to use the displace filter to make it seem like the matrix symbols follow the face. make a duplicate of your photo layer, and make it greyscale. This is going to be your displacement map. All you'll have to know for now (if you haven't read the tutorial) is that the white parts of the picture are going to be moved to the top-left, and the darker parts are going to be moved to the lower-right. the 50% grey parts will stay in place.
now, save your PSD at a place and with a name you'll remember (the next 5 minutes or so) and go back to imageready for the animation you have. click to the button to move it to photoshop (it's the lowest button in the tools-bar, it has a nifty arrow on it).
when you've landed in PS, click [filter>distort>displace]. set horizontal scale to 10%, vertical to 2%. as the displacement map is the same size as the animation, you don't have to worry about the other settings.
click OK, specify the PSD I told you to remember, and check if the effect is to your liking. If not, go back to your heightmap and tinker with it, or try some other settings with the displace filter.
If you're happy with it, run the displace filter on all layers (frames) of the animation. you can simply press CTRL-F, it'll repeat the last filter you used.
Move for imageready for a second, and check if in frame 1, only layer 1 is visible, in frame 2 only layer 2, and so on. then get back to PS.
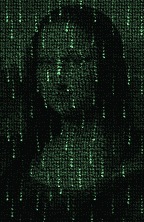
then, go back to your 'displacement map' PSD, take a look at your original photo. copy it, and paste it on top in the animation PSD. desaturate the photo, and fiddle with opacities and blending modes until you have something you like. I recommend Overlay on a 30% setting.
Now, you've got a nice matrix effect, but no color. make a new layer on top of your photo layer, fill it with green (any green) and set the blending move to color. now, use [image>adjust>hue/saturation] to fix things. go back to imageready, and check if the changes you made have effect in every frame. (If you need to tamper with it any further, do it in imageready, in frame 1. Everything that's changed in IR in frame 1 will also be changed in the other frames.
Now, resize your image, check for all the export settings (check here for reference), test it, and rework anything you think that might needs work.
This concludes the mini-tutorial.
Annotations:
If it doesn't let you run any filters when you switch back to photoshop, you might have currently selected an invisible layer.
Edit: mahjqa is prefectly aware that the monalisamatrixanimation jumps in one frame, but he's too tired to fix it. sorry.