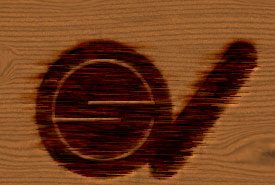
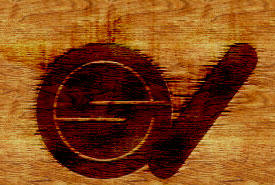
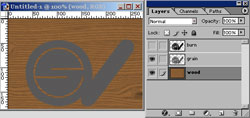
The original thread for this is lost but (thanks to docilebob who also recreated all the images and the PSD for your added viewing pleasure) we still have DarkGarden's mini-tutorial so to get an image like this:
quote:
Okay, fast and dirty, let's see if I can explain it. I just whipped it up tonight after seeing this post so the method is a bit fresh.
I cheated on the texture and had a premade one that I've used for a while. Thought the suggestions on wood texture above work well (especially F1's I'm a proponent of playing with real nature)
So, with our base wood texture in place..here we go.
1. Make a new channel, filling the shape you want "burned in" with white on the default black background. Make a selection of this (hold Ctrl or Command and click, or drag down to the dotted "load" circle)
2. Create a New Layer, and fill the selection with a medium, to dark grey. We'll name this layer "Grain" for when I reference it in a sec.
3. Create another New Layer (keep the original selection) and fill the selection on this layer with black, and we'll name this one "Burn". Click the eye beside the layer to make this one invisible for now. Now ditch the selection for now. (SELECT>>>DESELECT, or just click anywhere with the marquee tool selected)
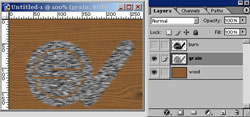
4. Go back to the Grain Layer. Go to FILTERS>>>NOISE>>>ADD NOISE. Play with your settings for different results, but I used about 150 for the amount, and set to Gaussian, and monochromatic.
5. Now, go to FILTERS>>>BLUR>>>MOTION BLUR. Make a blur of 5 to ten pixels in the direction of the grain.
6. Still on the Grain Layer, go to FILTERS>>>STYLIZE>>>WIND. Use normal wind, no blast or stagger. Go from left. Click OK. Now repeat once.
Do the wind filter again, but change the settings to go From right. And repeat once more.
So that's 4 filterings with wind...two left, two right (in case anyone got confused)
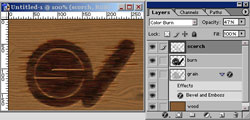
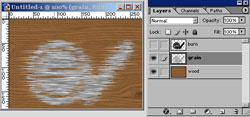
7. Go to the Blending Mode menu, and select Color Burn. Play with the opacity a bit, but setting to about 80 percent or so gives decent results.
8. Now we cheat..heh. (WARNING: Purists or people using PS 4 or less, use Doc's inset bar tutorial for the next part, it's linked above, and is the preferred method when I'm not cheating )
Right click on the Grain Layer to and click on Layer Effects. Shut off the default drop shadow, and go to Bevel and Emboss.
Use an Outer Bevel, Down, with a depth of only 2 or 3, and a blur of 0 or 1. Play with your highlight and shadow, but setting to about 65% for both, and using either screen or color dodge for the highlights, and multiply, or color burn for the shadows works well depending on how "glossy" you want the burn edge to look.
9. Click on the Burn Layer now to make it visible again. Go to the Blending Mode menu and set to Color Burn. Start dropping the opacity until you get a nice dark shape, that still shows the wood grain through rather well. This step just helps keep the shape defined in the "burnt wood".
10. Go back to the Channels palette (or use the Ctrl Key Click method on the Burn Layer) and make the shape Selection again. Create a new layer above the Burn Layer, and name it Scorch.
11. get your Airbrush Tool, and make a few random strokes/splotches using black on the Scorch Layer. Deselect, and set to Color Burn. Again, play with the opacity to get the little overburnt areas to mesh with the grain.
----------------------
Now, that does it, except for the vertical "scorch lines" that you see there. I'll go through those really fast, as they're unnecessary, but they add to the reality of wood burns.
----------------------
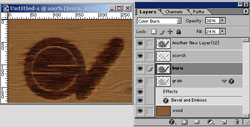
12. Another New Layer, use the shape selection, and the same grey fill, and Noise settings we used for the Grain Layer.
13. Deselect, and go to IMAGE>>>ROTATE CANVAS>>>90° CW. Once that's done, do a motion blur (horizontal, a few pixels) and go to IMAGE>>>ADJUST>>>INVERT.
14.Run the wind filter again. From Right, and repeat two or three more times. Now redo the Invert from the last step.
15. Do a very slight gaussian blur (FILTERS>>>BLUR>>>GAUSSIAN less than 1.5 pixels) and set the blending mode to...you guessed it...Color Burn. Now adjust the opacity.... Rotate the Canvas 90° CCW....
Burnt wood that shows the edges of the grain that depress and burn out.
You can play with blurs on the Grain Layer to give more of a subtle edge, or airbrush outside the shape lines a little bit to account for an overburnt area. Have fun with it anyway.
Okee, that was much longer than I wanted, but hopefully it gets the method across to most. Let me know if it does or doesn't, I'll see what I can do.


.jpg)