|
| |
warjournal
Maniac (V) Mad Scientist
From:
Insane since: Aug 2000
|
 posted 12-30-2003 01:56
Been meaning to do this for the longest time and finally got around to it. Once I sat down to it, it didn't take nearly as much time as I thought it would. I think this will also be a nice change of pace.
Take the various renders and slap 'em together in Photoshop to make it beautiful. All of the renders are greyscale, so it's up to you to add colour. Then it's a matter of getting creative with blending modes and layering it up.
multipass 2
I'll be back when I can with my fiddle.
For now, I have to get back to the salt mine.
|
vogonpoet
Maniac (V) Mad Scientist
From: Mi, USA
Insane since: Aug 2000
|
posted 12-30-2003 02:09
hmmmm... interesting..... got me thinking ye have...
|
warjournal
Maniac (V) Mad Scientist
From:
Insane since: Aug 2000
|
posted 12-30-2003 02:30
Use your brain, VP. You know you want to. Besides, when's the last time you came out to play?
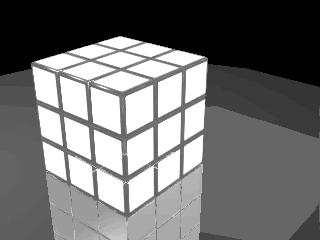
This is what I did in about 15 minutes. Shadow needs work and some jaggies need blasting, but it definitely shows potential. (And I just had to sneak Biker Chic in there.)

If I remember correctly, it was Das that was the first to talk about this in these halls. Definitely good stuff. The major cool part is that you don't have to re-render to get different results. Just give it a tweak here and there and it good.
Slime, remember we chatted about blending modes add and subtract? Turns out they are in PS 7 by the names of Linear Dodge and Linear Burn. I believe Linear Dodge in Add, and Linear Burn is subtract but upside down so to speak. Then there is Linear Light which works at 128. I don't remember if this was mentioned when we talked about it. I bring this up because two of the passes (reflect something or other) was done in additive and should be set to "add" when composited in PS.
Get to work.
|
UnknownComic
Paranoid (IV) Inmate
From: Los Angeles
Insane since: Nov 2003
|
posted 12-30-2003 03:38
errr... is their a prferred order to assemble these? And, is it all burn and dodge? Or, do we need to use the whole gamut of layer blending modes?
______________
Is This Thing On?

Bleah...
|
jstuartj
Bipolar (III) Inmate
From: Mpls, MN
Insane since: Dec 2000
|
posted 12-30-2003 03:39
I have been been playing with multi-pass in Photoshop for a while now. But mostly rendering seperate objects, the z-buffer, and shadows. But recently getting DFX+ has tweeked my intrest. I plan to experment more with multi-pass. Have you tried playing with Z-buffers? They work great combined with alpha channels to it to create adjustable depth of field and fog effects. The shadow buffer is also helpful when you what soft shadow at print resolutions, as you can had edit the shadow seperate avoiding that Area light, GL, or Radiosity speed hit.
For those intrested here is an artical that touchs briefly on the multi-pass / compositing.
http://www.3dgate.com/techniques/2001/010507/0507banta.html
J. Stuart J.
[This message has been edited by jstuartj (edited 12-30-2003).]
|
UnknownComic
Paranoid (IV) Inmate
From: Los Angeles
Insane since: Nov 2003
|
posted 12-30-2003 03:49
|
warjournal
Maniac (V) Mad Scientist
From:
Insane since: Aug 2000
|
posted 12-30-2003 05:05
Ack! Links!
http://www.lightwaveoz.org/tutorials/multi_pass.php
http://cedar.he.net/~jackal/lightwave/multipass/index.htm
Those should give a pretty good idea of how to procede.
UC, not bad if you're not sure as to what's going on. My bad for not tossing out some links earlier (thanks, jstuartj).
As far as blending modes and layer order, it depends on what you are going for. My example was a little more on the realistic side, so I had to put some thought into it. Yours has a reverse shadow, which I think is good use of creative license. Definitely feel free to mix it up and mess around. Or be anally contrived.
JSJ, I haven't gotten into z-buffer just yet. The closest I ever came is using geometry to fake volume lights real quick like. I'll be looking into it soon, though. If I do more of these comp challenges, I'll probably toss in a few z renders.
|
Taobaybee
Maniac (V) Inmate
From: The Pool Of Life
Insane since: Feb 2003
|
posted 12-30-2003 05:18
I know I could/should have done more , but this is what I managed in about 30 minutes.
Cheers WarJ
toa

|
UnknownComic
Paranoid (IV) Inmate
From: Los Angeles
Insane since: Nov 2003
|
posted 12-30-2003 06:11
Reverse shadow? Where?
I cant seem to get rid of the lights inside the cube...
And, making colors show up is a bitch. Nevermind a fancy wood table and all.
Is there a plugin or filter that will compose all this for me?
j/k
[edit] Ooh, I saw that second link before... it made my head hurt, and sleepy[/edit]
______________
Is This Thing On?
Bleah...
[This message has been edited by UnknownComic (edited 12-30-2003).]
|
krets
Paranoid (IV) Mad Scientist
From: KC, KS
Insane since: Nov 2002
|
posted 12-30-2003 06:26

:::11oh1:::
|
Feste
Nervous Wreck (II) Inmate
From: British Columbia
Insane since: Nov 2001
|
posted 12-30-2003 07:07
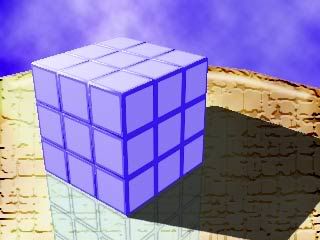
Ive never done something like this before, and i dont even think i did it right, I didnt even try to do it right, i just put the layers together (well most of em) added a touch of blue and came up with this...

-Feste
|
jstuartj
Bipolar (III) Inmate
From: Mpls, MN
Insane since: Dec 2000
|
posted 12-30-2003 07:41
I think think this might need a little more explaining.
By rendering in multi-pass, you given seperate element you and alter seperately for each other. This gives you the flexabiliy to change and modify the scene with out having to re-render. A real time save if radiosity or Global Illumination is used.
For instance in Warjournal image. I assume the wood texture and images, etc... were added afterward in Photoshop using various multi-path renders to control the masking, shading, reflections etc.... The advantage to this is noramlly if you whated to change picture on the faces of cube you would have to, re-image map and re-render the image. With multi-pass all you have to do is trasform a new image into a layer masked by one of the multi-pass generated alpha channels.
J. Stuart J.
|
UnknownComic
Paranoid (IV) Inmate
From: Los Angeles
Insane since: Nov 2003
|
posted 12-30-2003 08:38
Well... I cheated, I deleted all the black parts, and then did all my coloring...
______________
Is This Thing On?
Bleah...
|
jstuartj
Bipolar (III) Inmate
From: Mpls, MN
Insane since: Dec 2000
|
posted 12-30-2003 09:38
Well here is my static attempt.

It might be fun to try mapping video to the boxes, I might give it a try this weekend.
J. Stuart J.
|
moaiz
Maniac (V) Inmate
From:
Insane since: Nov 2000
|
posted 12-30-2003 10:50
|
warjournal
Maniac (V) Mad Scientist
From:
Insane since: Aug 2000
|
posted 12-30-2003 14:37
"I cant seem to get rid of the lights inside the cube..."
I assume you are talking about the "stickers" on the sides. The 3x3 things. That particular render is an alpha render to mask whatever you want to put on the sides of the bigger cube.
1. Toss the render in an alpha channel.
2. Start a new layer.
3. Load the alpha with ctrl + click.
4. Fill it.
5. Turn on Preserve Transparency.
6. Paint some colour onto the "faces".
That's how I did the red and blue in my example.
Done just like that, the sides will be "pure" and will be in need of shading. Take the lighting pass, put it on top, and set it to Multiply. Use the appropriate alpha render to mask it out.
"Reverse shadow? Where?
To the right of the cube. A shadow should darken - not lighten. But, like I said, creative license.
UC, I apologize for jumping into the deep end so quickly. I'm used to the folks around here getting the drift and I easily forget about the newer folks. I'll see about putting together a simple example or two.
|
Xdreamer.ch
Maniac (V) Inmate
From: Switzerland
Insane since: Mar 2001
|
posted 12-30-2003 17:12

^about 15min^

|
UnknownComic
Paranoid (IV) Inmate
From: Los Angeles
Insane since: Nov 2003
|
posted 12-30-2003 22:09
No need to apologize... the others were perfectly capable of following the 'composite' references. I am just a graphics newb hobbyist... Kinda like a 'jerk of all trades, master of none' type thing... LOL.
I did notice in the ship link that After affects treats the black space differently than photoshop does. PS tends to hang on to the black. I guess thats where your reference to Alpha Masking comes in. I just deleted the black. Later on I'll probably check out how Gimp handles it.
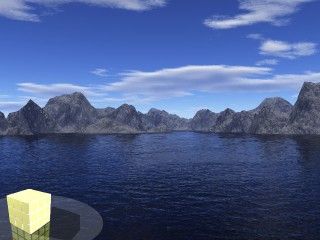
I did notice that my first inclination was to interpret the lower circular path as a table of some sort, but in retrospect, it is actually the light source falling onto the plane that the cube is resting on. I will fire up Terragen and put my cube foreground to a mountain... hmmm, perhaps floating on a lake?
Either way... Thanks for sharing this particular 'assignment'. I need to understand Alpha channels better. They still mystify me... oops, I'm talking to myself again.
______________
Is This Thing On?
Bleah...
|
synax
Maniac (V) Inmate
From: Cell 666
Insane since: Mar 2002
|
posted 12-30-2003 23:30

Hopefully this can clear a few things up for you, UC.
 "Nothin' like a pro-stabbin' from a pro." -Weadah "Nothin' like a pro-stabbin' from a pro." -Weadah
|
warjournal
Maniac (V) Mad Scientist
From:
Insane since: Aug 2000
|
posted 12-31-2003 01:46
UC, when I say alpha render or alpha mask, I'm talking about using it for a Layer Mask. I'm sure you'll figure out the lingo (Stroker speak) and stuff.
I know this hasn't been up long, but I'm almost ready to move on to the next one. The next one may seem simple on the surface, but it's a real doozy. I've been fighting with it for some time and I just had a break through with some help from Blend If (hi, Bmud).
Good show, folks.
Feel free to add more fiddling around if you get the itch.
I'm going to start seriously gearing up for the next one.
You know me. I'm a hurricane when I'm in the mood.
|
UnknownComic
Paranoid (IV) Inmate
From: Los Angeles
Insane since: Nov 2003
|
posted 12-31-2003 01:57
Thanks! Synax... it makes more sense now that I've seen your PSD.
It definitely puts it in a different light... I was not using the composite pieces as masks but as actual pieces... Then I just threw away all the black and tried something different.
[edit] Dont delay on my account WJ, I will catch up[/edit]
______________
Is This Thing On?
Bleah...
[This message has been edited by UnknownComic (edited 12-31-2003).]
|